# java
**Repository Path**: tecle/java
## Basic Information
- **Project Name**: java
- **Description**: No description available
- **Primary Language**: Java
- **License**: Not specified
- **Default Branch**: master
- **Homepage**: None
- **GVP Project**: No
## Statistics
- **Stars**: 0
- **Forks**: 0
- **Created**: 2020-05-11
- **Last Updated**: 2020-12-19
## Categories & Tags
**Categories**: Uncategorized
**Tags**: None
## README
# 图聚后端知识点总结
## 一、基础
### 1. elasticsearch6.5.3安装
*(注:安装之前请先确认服务器已安装好jdk1.8并配置好环境变量)*
#### 1) tar包下载
Elasticsearch 6.5.3 地址:[下载](https://artifacts.elastic.co/downloads/elasticsearch/elasticsearch-6.5.3.tar.gz)
其他版本的直接改为对应版本号下载即可下载
#### 2) 上传并解压
用的filezilla将下载好的elasticsearch-6.5.3.tar.gz上传至服务器指定目录,我上传到自建目录:/www/server
解压:
[root@localhost ~]# cd /www/server
[root@localhost server]# tar -zxvf elasticsearch-6.5.3.tar.gz
#### 3)创建用户(elasticsearch默认是不允许使用root用户启动的,以root身份启动会报错)
[root@localhost server]# adduser hoey
[root@localhost server]# mkdir -p esdata/data
[root@localhost server]# mkdir -p esdata/log
[root@localhost server]# chown -R hoey elasticsearch-6.5.3
[root@localhost server]# chown -R hoey esdata
创建用户是为了防止以root身份启动时报如下错误:
Exception in thread “main” java.lang.RuntimeException: don’t run elasticsearch as root。
#### 4) 修改elasticsearch-6.5.3/config/elasticsearch.yml配置文件
```properties
#
#
cluster.name: my-application
#
#
node.name: node-1
#
#
node.attr.rack: r1
#
#注意这里的路径是第三步创建的目录路径 /www/server/esdata/data
path.data: /www/server/esdata/data
#
#注意这里的路径是第三步创建的目录路径 /www/server/esdata/log
path.logs: /www/server/esdata/log
#
#
bootstrap.memory_lock: false
bootstrap.system_call_filter: false
#
#0.0.0.0代表任何IP都可访问
network.host: 0.0.0.0
#
#开启端口
http.port: 9200
#
#
action.destructive_requires_name: true
```
在上述文件加上
```properties
bootstrap.memory_lock: false
bootstrap.system_call_filter: false
```
是为了解决以下报错:
unable to install syscall filter:
java.lang.UnsupportedOperationException: seccomp unavailable: CONFIG_SECCOMP not compiled into kernel, CONFIG_SECCOMP and CONFIG_SECCOMP_FILTER are needed
#### 5) 修改/etc/security/limits.conf配置文件
在/etc/security/limits.conf配置文件文件中加上:
```properties
* soft nofile 65536
* hard nofile 131072
* soft nproc 4096
* hard nproc 4096
```
 修改limits.conf是为了解决以下报错:
ERROR: [3] bootstrap checks failed
[1]: max file descriptors [4096] for elasticsearch process is too low, increase to at least [65536]
#### 6) 修改/etc/sysctl.conf配置文件
在文件最后加上:
```properties
vm.max_map_count = 2621441
```
修改limits.conf是为了解决以下报错:
ERROR: [3] bootstrap checks failed
[1]: max file descriptors [4096] for elasticsearch process is too low, increase to at least [65536]
#### 6) 修改/etc/sysctl.conf配置文件
在文件最后加上:
```properties
vm.max_map_count = 2621441
```
 让配置文件生效:
[root@localhost server]# sudo sysctl -p /etc/sysctl.conf
修改sysctl.conf是为了解决以下报错:
max virtual memory areas vm.max_map_count [65530] is too low, increase to at least [262144]
#### 7) 修改/etc/security/limits.d/90-nproc.conf配置文件
将/etc/security/limits.d/90-nproc.conf文件改为:
```properties
* soft nproc 4096
root soft nproc 4096
```
让配置文件生效:
[root@localhost server]# sudo sysctl -p /etc/sysctl.conf
修改sysctl.conf是为了解决以下报错:
max virtual memory areas vm.max_map_count [65530] is too low, increase to at least [262144]
#### 7) 修改/etc/security/limits.d/90-nproc.conf配置文件
将/etc/security/limits.d/90-nproc.conf文件改为:
```properties
* soft nproc 4096
root soft nproc 4096
```
 修改上述文件是为了解决以下报错:(注意我这里报的是4096,配置文件中的数据应根据报错的来改,改成大于等于报错数据即可)
[3]: max number of threads [2048] for user [tongtech] is too low, increase to at least [4096]
#### 8) 启动
修改/etc/security/limits.conf文件需要重新登录才生效,所以我退出连接重新登录了一下.
1.启动前先关闭防火墙:(该命令是centos6.x版本永久关闭防火墙命令,centos7防火墙命令对应的是firewalld)
[root@localhost server]# chkconfig iptables off
2.进入elasticsearch的bin目录
[root@localhost server]# cd /www/server/elasticsearch-6.5.3/bin
3.切换为第三步创建的用户hoey
[root@localhost bin]# su hoey
4.启动elasticsearch(确认当前命令目录是在bin目录下)
[hoey@localhost bin]$ ./elasticsearch
#### 9) 浏览器访问
修改上述文件是为了解决以下报错:(注意我这里报的是4096,配置文件中的数据应根据报错的来改,改成大于等于报错数据即可)
[3]: max number of threads [2048] for user [tongtech] is too low, increase to at least [4096]
#### 8) 启动
修改/etc/security/limits.conf文件需要重新登录才生效,所以我退出连接重新登录了一下.
1.启动前先关闭防火墙:(该命令是centos6.x版本永久关闭防火墙命令,centos7防火墙命令对应的是firewalld)
[root@localhost server]# chkconfig iptables off
2.进入elasticsearch的bin目录
[root@localhost server]# cd /www/server/elasticsearch-6.5.3/bin
3.切换为第三步创建的用户hoey
[root@localhost bin]# su hoey
4.启动elasticsearch(确认当前命令目录是在bin目录下)
[hoey@localhost bin]$ ./elasticsearch
#### 9) 浏览器访问
 ### 2.idea相关插件
#### 1) 热部署工具:jrebel
##### ①下载
1、在IDEA中一次点击 File->Settings->Plugins->Brows Repositories
2、在搜索框中输入JRebel进行搜索
3、找到JRebel for intellij
4、install
5、安装好之后需要restart IDEA
### 2.idea相关插件
#### 1) 热部署工具:jrebel
##### ①下载
1、在IDEA中一次点击 File->Settings->Plugins->Brows Repositories
2、在搜索框中输入JRebel进行搜索
3、找到JRebel for intellij
4、install
5、安装好之后需要restart IDEA
 ##### ②激活
点击https://active.jrebel.cn/
##### ③使用
##### ②激活
点击https://active.jrebel.cn/
##### ③使用
 #### 2) mybatis log查看
##### ①下载
Idea的plugins里面搜索mybatis log plugin,然后安装
##### ②使用
安装完老套路重启idea,重启之后是不是发现装的插件不见了.别急,在idea的tool里面呢,注意看下图:
#### 2) mybatis log查看
##### ①下载
Idea的plugins里面搜索mybatis log plugin,然后安装
##### ②使用
安装完老套路重启idea,重启之后是不是发现装的插件不见了.别急,在idea的tool里面呢,注意看下图:
 这样在执行sql的时候就可以打印出系统生成好的sql,方便排查问题
#### 3) 其他插件:
Free Mybatis plugin(快速从代码跳转到mapper及从mapper返回代码)
.ignore(自动创建.ignore文件)
Alibaba Java Coding Guidelines(阿里巴巴Java开发规约扫描插件)
### 3.问题排查
#### 1) 服务挂掉
1.检查数据库、redis是否正常;
2.检查是否有依赖服务挂掉;
3.是否访问限制,如:端口禁用、域名解析被改、阿里负载均衡;
4.重新启动服务,看控制台日志。
#### 2) 服务报500
1.本地跑一下,还原问题,排查sql编写问题、逻辑处理问题等;
2.如果本地没问题,则尝试改端口上传服务器再运行,使用swagger请求原接口,在开发者工具复制curl语句,然后在服务器上**更改ip+端口**发起请求查看问题;
3.**注意控制台报错**,注意是否有多个服务注册到线上服务器注册中心,如本地服务。
#### 3) 服务器无响应(运行中)
1.检查是否有线程阻塞;
2.检查是否因为请求其他http服务导致线程全部等待中;
3.检查数据库、redis等是否访问时间过长。
#### 4) 终极大法(二分法)
确定前端问题(参数没有按照要求)还是后端问题,确定是数据库等外部链接问题还是内部逻辑问题,每个步骤的断点数据是否是预期数据等。
### 4.算法
每个图聚后端都需要多多少少会算法,周末没事刷刷题:https://leetcode-cn.com/
## 二、第三方
### 1.微信相关
#### 1) 公众号、小程序openId获取流程
所有微信相关的接口基本都需要获取accessToken,每天获取上限2000次,2小时过期,建议获取后保存至数据库或redis:
##### **公众号获取openid:**
这样在执行sql的时候就可以打印出系统生成好的sql,方便排查问题
#### 3) 其他插件:
Free Mybatis plugin(快速从代码跳转到mapper及从mapper返回代码)
.ignore(自动创建.ignore文件)
Alibaba Java Coding Guidelines(阿里巴巴Java开发规约扫描插件)
### 3.问题排查
#### 1) 服务挂掉
1.检查数据库、redis是否正常;
2.检查是否有依赖服务挂掉;
3.是否访问限制,如:端口禁用、域名解析被改、阿里负载均衡;
4.重新启动服务,看控制台日志。
#### 2) 服务报500
1.本地跑一下,还原问题,排查sql编写问题、逻辑处理问题等;
2.如果本地没问题,则尝试改端口上传服务器再运行,使用swagger请求原接口,在开发者工具复制curl语句,然后在服务器上**更改ip+端口**发起请求查看问题;
3.**注意控制台报错**,注意是否有多个服务注册到线上服务器注册中心,如本地服务。
#### 3) 服务器无响应(运行中)
1.检查是否有线程阻塞;
2.检查是否因为请求其他http服务导致线程全部等待中;
3.检查数据库、redis等是否访问时间过长。
#### 4) 终极大法(二分法)
确定前端问题(参数没有按照要求)还是后端问题,确定是数据库等外部链接问题还是内部逻辑问题,每个步骤的断点数据是否是预期数据等。
### 4.算法
每个图聚后端都需要多多少少会算法,周末没事刷刷题:https://leetcode-cn.com/
## 二、第三方
### 1.微信相关
#### 1) 公众号、小程序openId获取流程
所有微信相关的接口基本都需要获取accessToken,每天获取上限2000次,2小时过期,建议获取后保存至数据库或redis:
##### **公众号获取openid:**
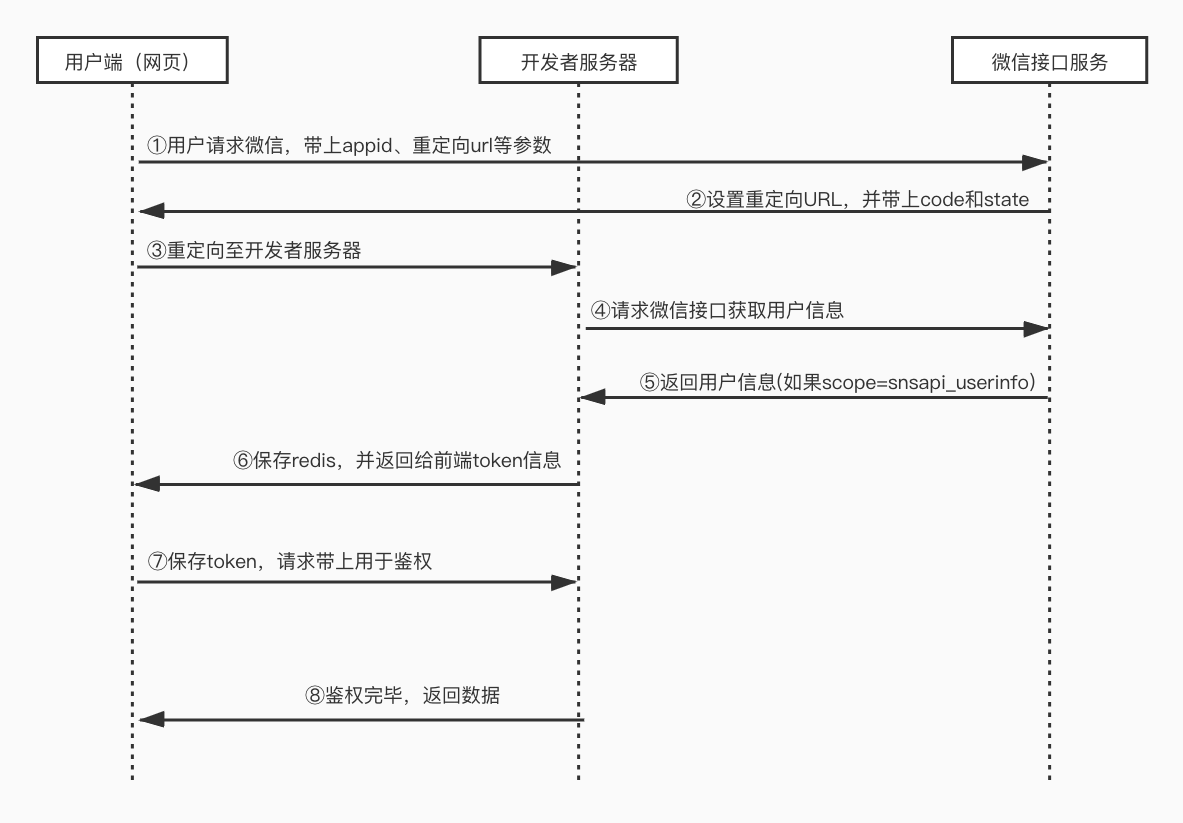 ①用户通过菜单或者重定向的方式访问微信服务器,地址格式为:
https://open.weixin.qq.com/connect/oauth2/authorize?appid=${appId}&redirect_uri=${redirectUri}&response_type=code&scope=snsapi_userinfo&state=1#wechat_redirect
***注意:当scope为snsapi_base是静默登录,scope为snsapi_userinfo需要用户手动同意。***
②请求成功后,微信会回调 redirectUri 地址,并在参数后带上code和state:
${redirectUri}?code=CODE&state=STATE;
③网页请求后端服务器,参数为code、state;
④后端服务器请求微信接口获取用户信息;
⑤微信服务器返回给后端用户信息,若scope为snsapi_userinfo,则有额外的用户信息字段;
⑥服务端生成token,并和open_id关联,之后返回给前端;
⑦用户每次访问接口,带上token;
⑨后端服务通过token鉴权,可知道是谁访问了这个接口。
##### **小程序获取openid:**
①用户通过菜单或者重定向的方式访问微信服务器,地址格式为:
https://open.weixin.qq.com/connect/oauth2/authorize?appid=${appId}&redirect_uri=${redirectUri}&response_type=code&scope=snsapi_userinfo&state=1#wechat_redirect
***注意:当scope为snsapi_base是静默登录,scope为snsapi_userinfo需要用户手动同意。***
②请求成功后,微信会回调 redirectUri 地址,并在参数后带上code和state:
${redirectUri}?code=CODE&state=STATE;
③网页请求后端服务器,参数为code、state;
④后端服务器请求微信接口获取用户信息;
⑤微信服务器返回给后端用户信息,若scope为snsapi_userinfo,则有额外的用户信息字段;
⑥服务端生成token,并和open_id关联,之后返回给前端;
⑦用户每次访问接口,带上token;
⑨后端服务通过token鉴权,可知道是谁访问了这个接口。
##### **小程序获取openid:**
 ①小程序获取open_id少了重定向,直接使用wx.login()方法获取code;
②请求后端服务器,后端直接使用appid + appsecret + code得到用户open_id,后续和公众号处理方式一样。
#### 2) 微信支付
公司用的最多的是小程序支付,这里着重介绍:
需要准备的:
-->1.程序访问商户服务都是通过HTTPS,开发部署的时候需要安装HTTPS服务器;
-->2.小程序appId、appSecret,微信支付商户mchId、apiKey、证书(退款用,不需要可忽略);
-->3.在商户后台绑定小程序,并设置域名白名单。
支付流程:
①小程序获取open_id少了重定向,直接使用wx.login()方法获取code;
②请求后端服务器,后端直接使用appid + appsecret + code得到用户open_id,后续和公众号处理方式一样。
#### 2) 微信支付
公司用的最多的是小程序支付,这里着重介绍:
需要准备的:
-->1.程序访问商户服务都是通过HTTPS,开发部署的时候需要安装HTTPS服务器;
-->2.小程序appId、appSecret,微信支付商户mchId、apiKey、证书(退款用,不需要可忽略);
-->3.在商户后台绑定小程序,并设置域名白名单。
支付流程:
 ***注意:微信支付需要终端ip的必填参数,使用nginx或负载时,不能使用request.getRemoteAddr(),应该使用IPUtils获取:***
```java
import org.slf4j.Logger;
import org.slf4j.LoggerFactory;
import javax.servlet.http.HttpServletRequest;
/**
* IP地址
*
*/
public class IPUtils {
private static Logger logger = LoggerFactory.getLogger(IPUtils.class);
/**
* 获取IP地址
*
* 使用Nginx等反向代理软件, 则不能通过request.getRemoteAddr()获取IP地址
* 如果使用了多级反向代理的话,X-Forwarded-For的值并不止一个,而是一串IP地址,X-Forwarded-For中第一个非unknown的有效IP字符串,则为真实IP地址
*/
public static String getIpAddr(HttpServletRequest request) {
String ip = null;
try {
ip = request.getHeader("x-forwarded-for");
if (StringUtil.isEmpty(ip) || "unknown".equalsIgnoreCase(ip)) {
ip = request.getHeader("Proxy-Client-IP");
}
if (StringUtil.isEmpty(ip) || "unknown".equalsIgnoreCase(ip)) {
ip = request.getHeader("X-Real-IP");
}
if (StringUtil.isEmpty(ip) || ip.length() == 0 || "unknown".equalsIgnoreCase(ip)) {
ip = request.getHeader("WL-Proxy-Client-IP");
}
if (StringUtil.isEmpty(ip) || "unknown".equalsIgnoreCase(ip)) {
ip = request.getHeader("HTTP_CLIENT_IP");
}
if (StringUtil.isEmpty(ip) || "unknown".equalsIgnoreCase(ip)) {
ip = request.getHeader("HTTP_X_FORWARDED_FOR");
}
if (StringUtil.isEmpty(ip) || "unknown".equalsIgnoreCase(ip)) {
ip = request.getRemoteAddr();
}
} catch (Exception e) {
logger.error("IPUtils ERROR ", e);
}
//使用代理,则获取第一个IP地址
if(StringUtil.isNotEmpty(ip) && ip.length() > 15) {
if(ip.indexOf(",") > 0) {
ip = ip.substring(0, ip.indexOf(","));
}
}
return ip;
}
}
```
文档地址:https://pay.weixin.qq.com/wiki/doc/api/wxa/wxa_api.php?chapter=9_1
***微信回调后,必须进行校验方可入库***
***随机字符串需要后端生成,前端不能改,timestamp不能差别太多,否则校验不通过***
**PS:其他支付和微信支付原理差不多,demo:https://gitee.com/52itstyle/springMvc-dubbo-pay **
#### 2) 微信第三方授权
##### 1.申请微信开放平台帐号并创建第三方平台;
***注意:微信支付需要终端ip的必填参数,使用nginx或负载时,不能使用request.getRemoteAddr(),应该使用IPUtils获取:***
```java
import org.slf4j.Logger;
import org.slf4j.LoggerFactory;
import javax.servlet.http.HttpServletRequest;
/**
* IP地址
*
*/
public class IPUtils {
private static Logger logger = LoggerFactory.getLogger(IPUtils.class);
/**
* 获取IP地址
*
* 使用Nginx等反向代理软件, 则不能通过request.getRemoteAddr()获取IP地址
* 如果使用了多级反向代理的话,X-Forwarded-For的值并不止一个,而是一串IP地址,X-Forwarded-For中第一个非unknown的有效IP字符串,则为真实IP地址
*/
public static String getIpAddr(HttpServletRequest request) {
String ip = null;
try {
ip = request.getHeader("x-forwarded-for");
if (StringUtil.isEmpty(ip) || "unknown".equalsIgnoreCase(ip)) {
ip = request.getHeader("Proxy-Client-IP");
}
if (StringUtil.isEmpty(ip) || "unknown".equalsIgnoreCase(ip)) {
ip = request.getHeader("X-Real-IP");
}
if (StringUtil.isEmpty(ip) || ip.length() == 0 || "unknown".equalsIgnoreCase(ip)) {
ip = request.getHeader("WL-Proxy-Client-IP");
}
if (StringUtil.isEmpty(ip) || "unknown".equalsIgnoreCase(ip)) {
ip = request.getHeader("HTTP_CLIENT_IP");
}
if (StringUtil.isEmpty(ip) || "unknown".equalsIgnoreCase(ip)) {
ip = request.getHeader("HTTP_X_FORWARDED_FOR");
}
if (StringUtil.isEmpty(ip) || "unknown".equalsIgnoreCase(ip)) {
ip = request.getRemoteAddr();
}
} catch (Exception e) {
logger.error("IPUtils ERROR ", e);
}
//使用代理,则获取第一个IP地址
if(StringUtil.isNotEmpty(ip) && ip.length() > 15) {
if(ip.indexOf(",") > 0) {
ip = ip.substring(0, ip.indexOf(","));
}
}
return ip;
}
}
```
文档地址:https://pay.weixin.qq.com/wiki/doc/api/wxa/wxa_api.php?chapter=9_1
***微信回调后,必须进行校验方可入库***
***随机字符串需要后端生成,前端不能改,timestamp不能差别太多,否则校验不通过***
**PS:其他支付和微信支付原理差不多,demo:https://gitee.com/52itstyle/springMvc-dubbo-pay **
#### 2) 微信第三方授权
##### 1.申请微信开放平台帐号并创建第三方平台;

 **其中:授权事件接收URL是微信每隔10分钟会请求此地址,带上ticket,后面获取第三方accessToken需要用到**
##### 2.获取第三方平台access_token
通过授权事件接收URL获取到ticket后,请求获取第三方accessToken;
http请求方式: POST(请使用https协议)
https://api.weixin.qq.com/cgi-bin/component/api_component_token
POST数据示例:
```json
{
"component_appid":"appid_value" ,
"component_appsecret": "appsecret_value",
"component_verify_ticket": "ticket_value"
}
```
请求参数说明
|参数名称|参数含义|
|--|:--:|
|component_appid|第三方平台appid|
|component_appsecret|第三方平台appsecret|
|component_verify_ticket|微信后台推送的ticket,此ticket会定时推送|
返回结果示例
```json
{
"component_access_token":"61W3mEpU66027wgNZ_MhGHNQDHnFATkDa9-2llqrMBjUwxRSNPbVsMmyD-yq8wZETSoE5NQgecigDrSHkPtIYA",
"expires_in":7200
}
```
结果参数说明
参数名称|参数含义
--|:--:
component_access_token|第三方平台access_token
expires_in|有效期
##### 3.获取预授权码
每次发起授权,都需要获取预授权码:
http请求方式: POST(请使用https协议)
https://api.weixin.qq.com/cgi-bin/component/api_create_preauthcode?component_access_token=xxx
POST数据示例:
```json
{
"component_appid":"appid_value"
}
```
请求参数说明
|参数名称|参数含义|
|--|:--:|
|component_appid|第三方平台appid|
返回结果示例
```json
{
"pre_auth_code": "Cx_Dk6qiBE0Dmx4EmlT3oRfArPvwSQ-oa3NL_fwHM7VI08r52wazoZX2Rhpz1dEw",
"expires_in": 600
}
```
结果参数说明
|参数名称|参数含义|
|--|:--:|
|pre_auth_code|预授权码|
|expires_in|有效期|
##### 4.引导进入授权页面
**这里需要注意,微信第三方授权要求refer页面必须授权可信的白名单地址,所以需要在一个白名单域名下html页面,加一个按钮,按钮的响应地址为:**
https://mp.weixin.qq.com/cgi-bin/componentloginpage?component_appid=xxxx&pre_auth_code=xxxxx&redirect_uri=xxxx
|参数名称|参数含义|
|--|:--:|
|component_appid|第三方平台appid|
|pre_auth_code|第三步获取的预授权码|
|redirect_uri|授权成功后的结果页面,用于给用户用户展示|
该网址中第三方平台方需要提供第三方平台方appid、预授权码和回调URI。
##### 5.授权后回调URI,得到授权码和过期时间
授权流程完成后,会进入回调URI,并在URL参数中返回授权码和过期时间(redirect_url?auth_code=xxx&expires_in=600)
##### 6.使用授权码换取公众号的授权信息
接口调用请求说明
http请求方式: POST(请使用https协议)
https://api.weixin.qq.com/cgi-bin/component/api_query_auth?component_access_token=xxxx
POST数据示例:
```json
{
"component_appid": "appid_value",
"authorization_code": "auth_code_value"
}
```
请求参数说明
|参数名称|参数含义|
|--|:--:|
|component_appid|第三方平台appid|
|authorization_code|授权code,第5步获取到的授权码|
返回结果示例
```json
{
"authorization_info": {
"authorizer_appid": "wxf8b4f85f3a794e77",
"authorizer_access_token": "QXjUqNqfYVH0yBE1iI_7vuN_9gQbpjfK7hYwJ3P7xOa88a89-Aga5x1NMYJyB8G2yKt1KCl0nPC3W9GJzw0Zzq_dBxc8pxIGUNi_bFes0qM",
"expires_in": 7200,
"authorizer_refresh_token": "dTo-YCXPL4llX-u1W1pPpnp8Hgm4wpJtlR6iV0doKdY",
"func_info": [{
"funcscope_category": {
"id": 1
}
},
{
"funcscope_category": {
"id": 2
}
},
{
"funcscope_category": {
"id": 3
}
}
]
}
}
```
结果参数说明
|参数名称|参数含义|
|--|:--:|
|authorization_info|授权信息|
|authorizer_appid|授权方appid|
|authorizer_access_token|授权方令牌(在授权的公众号具备API权限时,才有此返回值)|
|expires_in|有效期(在授权的公众号具备API权限时,才有此返回值)|
|authorizer_refresh_token|刷新令牌(在授权的公众号具备API权限时,才有此返回值),只会在授权时刻提供,请妥善保存。 一旦丢失,只能让用户重新授权|
|func_info|公众号授权给开发者的权限集列表|
#### 3) 公众号模板消息推送流程
1.需要获取公众号的accessToken,具体参考获取openid的accessToken;
2.公众号后台添加消息模板(上限25个,如果添加搜索到的,可以直接添加,如果自建消息模板,则需要最长**15天**的审核期);
3.调用发送模板接口:
http请求方式: POST
地址:https://api.weixin.qq.com/cgi-bin/message/template/send?access_token=ACCESS_TOKEN
POST数据示例如下:
```json
{
"touser": "OPENID",
"template_id": "ngqIpbwh8bUfcSsECmogfXcV14J0tQlEpBO27izEYtY",
"url": "http://weixin.qq.com/download",
"miniprogram": {
"appid": "xiaochengxuappid12345",
"pagepath": "index?foo=bar"
},
"data": {
"first": {
"value": "XX先生,挂号成功!",
"color": "#173177"
},
"keyword1": {
"value": "骨科",
"color": "#173177"
},
"keyword2": {
"value": "39.8元",
"color": "#173177"
},
"keyword3": {
"value": "2014年9月22日",
"color": "#173177"
},
"remark": {
"value": "点击此处进入导航!",
"color": "#173177"
}
}
}
```
参数说明
|参数名称|是否必填|参数含义|
|--|:----:|:----:|
|touser|是|接收者openid|
|template_id|是|模板ID|
|url|否|模板跳转链接|
|miniprogram|否|跳小程序所需数据,不需跳小程序可不用传该数据|
|appid|是|所需跳转到的小程序appid(该小程序appid必须与发模板消息的公众号是绑定关联关系,暂不支持小游戏)|
|pagepath|否|所需跳转到小程序的具体页面路径,支持带参数,(示例index?foo=bar),暂不支持小游戏|
|data|是|模板数据|
|color|否|模板内容字体颜色,不填默认为黑色|
注:url和miniprogram都是**非必填**字段,若都不传则模板无跳转;若都传,会优先跳转至小程序。开发者可根据实际需要选择其中一种跳转方式即可。当用户的微信客户端版本不支持跳小程序时,将会跳转至url。
返回码说明
在调用模板消息接口后,会返回JSON数据包。正常时的返回JSON数据包示例:
```json
{
"errcode": 0,
"errmsg": "ok",
"msgid": 200228332
}
```
### 2.阿里云相关
#### 1) MQ的使用
阿里云MQ使用需要topic、groupId、accessKey、secretKey、namesrvADDR
##### 客户端:
MQProducer:
```java
import com.aliyun.openservices.ons.api.ONSFactory;
import com.aliyun.openservices.ons.api.Producer;
import com.aliyun.openservices.ons.api.PropertyKeyConst;
import org.springframework.beans.factory.annotation.Value;
import org.springframework.stereotype.Service;
import javax.annotation.PostConstruct;
import java.util.Properties;
@Service
public class MQProducerSingleTon {
@Value("${alimq.topic}")
private String groupId;
@Value("${alimq.accessKey}")
private String accessKey;
@Value("${alimq.secretKey}")
private String secretKey;
@Value("${alimq.namesrvADDR}")
private String namesrvADDR;
private static Producer producer;
private static class SingletonHolder {
private static final MQProducerSingleTon INSTANCE = new MQProducerSingleTon();
}
private MQProducerSingleTon() {
}
static MQProducerSingleTon getInstance() {
return SingletonHolder.INSTANCE;
}
@PostConstruct
public void init() {
// producer 实例配置初始化
Properties properties = new Properties();
// 您在控制台创建的Producer ID
properties.setProperty(PropertyKeyConst.GROUP_ID, groupId);
// AccessKey 阿里云身份验证,在阿里云服务器管理控制台创建
properties.setProperty(PropertyKeyConst.AccessKey, accessKey);
// SecretKey 阿里云身份验证,在阿里云服务器管理控制台创建
properties.setProperty(PropertyKeyConst.SecretKey, secretKey);
//设置发送超时时间,单位毫秒
properties.setProperty(PropertyKeyConst.SendMsgTimeoutMillis, "3000");
// 设置 TCP 接入域名(此处以公共云生产环境为例)
properties.setProperty(PropertyKeyConst.NAMESRV_ADDR, namesrvADDR);
// 和上面的二选一,推荐下面这种方式,暂时链接不对 !!!!!!
producer = ONSFactory.createProducer(properties);
// 在发送消息前,必须调用start方法来启动Producer,只需调用一次即可
producer.start();
}
Producer getProducer() {
return producer;
}
}
```
AsyncMQService:
```java
import com.aliyun.openservices.ons.api.Message;
import com.aliyun.openservices.ons.api.Producer;
import com.aliyun.openservices.ons.api.SendResult;
import com.aliyun.openservices.ons.api.exception.ONSClientException;
import lombok.extern.slf4j.Slf4j;
import org.springframework.beans.factory.annotation.Value;
import org.springframework.scheduling.annotation.Async;
import org.springframework.stereotype.Service;
import javax.annotation.Resource;
@Slf4j
@Service
public class AsyncMQService {
@Resource
private MQProperties mqProperties;
@Value("${bdid}")
private String tags;
@Value("${sendToMq}")
private int sendToMq;
@Async(value = "MQTaskExecutor")
public void sendToMQTT(String data) {
log.info("发送的原始数据为---{}", data);
if (sendToMq == 1) {
Producer producer = MQProducerSingleTon.getInstance().getProducer();
Message message = new Message(mqProperties.getTopic(), tags, data.getBytes());
try {
SendResult sendResult = producer.send(message);
log.info("发送至阿里云成功--->{}", sendResult.getMessageId());
} catch (ONSClientException e) {
log.error("[ERROR]", e);
}
}
}
}
```
##### 接收端:
```java
import com.aliyun.openservices.ons.api.Action;
import com.aliyun.openservices.ons.api.ConsumeContext;
import com.aliyun.openservices.ons.api.Message;
import com.aliyun.openservices.ons.api.MessageListener;
import lombok.extern.slf4j.Slf4j;
import org.springframework.beans.factory.annotation.Value;
import org.springframework.stereotype.Service;
@Slf4j
@Service
public class PushMessageListener implements MessageListener {
@Value("${bdid}")
private String bdid;
@Override
public Action consume(Message message, ConsumeContext consumeContext) {
try {
if (bdid.equals(message.getTag())) {
String pushMessageStr = new String(message.getBody());
log.debug("从MQ接收到的消息为------->{}", pushMessageStr);
log.info("消费成功");
}
return Action.CommitMessage;
} catch (Exception e) {
// 消费失败,重发
log.error("[ERROR]", e);
return Action.ReconsumeLater;
}
}
}
```
***注意:其中tags是用来分别不同医院,进行数据隔离***
#### 2) 负载均衡
目前,我们大多数项目采用阿里负载均衡,一是方便的管理域名证书,二是图形化界面操作简便,可配置多台阿里服务器负载:
1.创建负载均衡实例(基本上已经创建);
2.域名解析:将指定域名解析至负载均衡服务器ip;
3.点击添加监听:
**其中:授权事件接收URL是微信每隔10分钟会请求此地址,带上ticket,后面获取第三方accessToken需要用到**
##### 2.获取第三方平台access_token
通过授权事件接收URL获取到ticket后,请求获取第三方accessToken;
http请求方式: POST(请使用https协议)
https://api.weixin.qq.com/cgi-bin/component/api_component_token
POST数据示例:
```json
{
"component_appid":"appid_value" ,
"component_appsecret": "appsecret_value",
"component_verify_ticket": "ticket_value"
}
```
请求参数说明
|参数名称|参数含义|
|--|:--:|
|component_appid|第三方平台appid|
|component_appsecret|第三方平台appsecret|
|component_verify_ticket|微信后台推送的ticket,此ticket会定时推送|
返回结果示例
```json
{
"component_access_token":"61W3mEpU66027wgNZ_MhGHNQDHnFATkDa9-2llqrMBjUwxRSNPbVsMmyD-yq8wZETSoE5NQgecigDrSHkPtIYA",
"expires_in":7200
}
```
结果参数说明
参数名称|参数含义
--|:--:
component_access_token|第三方平台access_token
expires_in|有效期
##### 3.获取预授权码
每次发起授权,都需要获取预授权码:
http请求方式: POST(请使用https协议)
https://api.weixin.qq.com/cgi-bin/component/api_create_preauthcode?component_access_token=xxx
POST数据示例:
```json
{
"component_appid":"appid_value"
}
```
请求参数说明
|参数名称|参数含义|
|--|:--:|
|component_appid|第三方平台appid|
返回结果示例
```json
{
"pre_auth_code": "Cx_Dk6qiBE0Dmx4EmlT3oRfArPvwSQ-oa3NL_fwHM7VI08r52wazoZX2Rhpz1dEw",
"expires_in": 600
}
```
结果参数说明
|参数名称|参数含义|
|--|:--:|
|pre_auth_code|预授权码|
|expires_in|有效期|
##### 4.引导进入授权页面
**这里需要注意,微信第三方授权要求refer页面必须授权可信的白名单地址,所以需要在一个白名单域名下html页面,加一个按钮,按钮的响应地址为:**
https://mp.weixin.qq.com/cgi-bin/componentloginpage?component_appid=xxxx&pre_auth_code=xxxxx&redirect_uri=xxxx
|参数名称|参数含义|
|--|:--:|
|component_appid|第三方平台appid|
|pre_auth_code|第三步获取的预授权码|
|redirect_uri|授权成功后的结果页面,用于给用户用户展示|
该网址中第三方平台方需要提供第三方平台方appid、预授权码和回调URI。
##### 5.授权后回调URI,得到授权码和过期时间
授权流程完成后,会进入回调URI,并在URL参数中返回授权码和过期时间(redirect_url?auth_code=xxx&expires_in=600)
##### 6.使用授权码换取公众号的授权信息
接口调用请求说明
http请求方式: POST(请使用https协议)
https://api.weixin.qq.com/cgi-bin/component/api_query_auth?component_access_token=xxxx
POST数据示例:
```json
{
"component_appid": "appid_value",
"authorization_code": "auth_code_value"
}
```
请求参数说明
|参数名称|参数含义|
|--|:--:|
|component_appid|第三方平台appid|
|authorization_code|授权code,第5步获取到的授权码|
返回结果示例
```json
{
"authorization_info": {
"authorizer_appid": "wxf8b4f85f3a794e77",
"authorizer_access_token": "QXjUqNqfYVH0yBE1iI_7vuN_9gQbpjfK7hYwJ3P7xOa88a89-Aga5x1NMYJyB8G2yKt1KCl0nPC3W9GJzw0Zzq_dBxc8pxIGUNi_bFes0qM",
"expires_in": 7200,
"authorizer_refresh_token": "dTo-YCXPL4llX-u1W1pPpnp8Hgm4wpJtlR6iV0doKdY",
"func_info": [{
"funcscope_category": {
"id": 1
}
},
{
"funcscope_category": {
"id": 2
}
},
{
"funcscope_category": {
"id": 3
}
}
]
}
}
```
结果参数说明
|参数名称|参数含义|
|--|:--:|
|authorization_info|授权信息|
|authorizer_appid|授权方appid|
|authorizer_access_token|授权方令牌(在授权的公众号具备API权限时,才有此返回值)|
|expires_in|有效期(在授权的公众号具备API权限时,才有此返回值)|
|authorizer_refresh_token|刷新令牌(在授权的公众号具备API权限时,才有此返回值),只会在授权时刻提供,请妥善保存。 一旦丢失,只能让用户重新授权|
|func_info|公众号授权给开发者的权限集列表|
#### 3) 公众号模板消息推送流程
1.需要获取公众号的accessToken,具体参考获取openid的accessToken;
2.公众号后台添加消息模板(上限25个,如果添加搜索到的,可以直接添加,如果自建消息模板,则需要最长**15天**的审核期);
3.调用发送模板接口:
http请求方式: POST
地址:https://api.weixin.qq.com/cgi-bin/message/template/send?access_token=ACCESS_TOKEN
POST数据示例如下:
```json
{
"touser": "OPENID",
"template_id": "ngqIpbwh8bUfcSsECmogfXcV14J0tQlEpBO27izEYtY",
"url": "http://weixin.qq.com/download",
"miniprogram": {
"appid": "xiaochengxuappid12345",
"pagepath": "index?foo=bar"
},
"data": {
"first": {
"value": "XX先生,挂号成功!",
"color": "#173177"
},
"keyword1": {
"value": "骨科",
"color": "#173177"
},
"keyword2": {
"value": "39.8元",
"color": "#173177"
},
"keyword3": {
"value": "2014年9月22日",
"color": "#173177"
},
"remark": {
"value": "点击此处进入导航!",
"color": "#173177"
}
}
}
```
参数说明
|参数名称|是否必填|参数含义|
|--|:----:|:----:|
|touser|是|接收者openid|
|template_id|是|模板ID|
|url|否|模板跳转链接|
|miniprogram|否|跳小程序所需数据,不需跳小程序可不用传该数据|
|appid|是|所需跳转到的小程序appid(该小程序appid必须与发模板消息的公众号是绑定关联关系,暂不支持小游戏)|
|pagepath|否|所需跳转到小程序的具体页面路径,支持带参数,(示例index?foo=bar),暂不支持小游戏|
|data|是|模板数据|
|color|否|模板内容字体颜色,不填默认为黑色|
注:url和miniprogram都是**非必填**字段,若都不传则模板无跳转;若都传,会优先跳转至小程序。开发者可根据实际需要选择其中一种跳转方式即可。当用户的微信客户端版本不支持跳小程序时,将会跳转至url。
返回码说明
在调用模板消息接口后,会返回JSON数据包。正常时的返回JSON数据包示例:
```json
{
"errcode": 0,
"errmsg": "ok",
"msgid": 200228332
}
```
### 2.阿里云相关
#### 1) MQ的使用
阿里云MQ使用需要topic、groupId、accessKey、secretKey、namesrvADDR
##### 客户端:
MQProducer:
```java
import com.aliyun.openservices.ons.api.ONSFactory;
import com.aliyun.openservices.ons.api.Producer;
import com.aliyun.openservices.ons.api.PropertyKeyConst;
import org.springframework.beans.factory.annotation.Value;
import org.springframework.stereotype.Service;
import javax.annotation.PostConstruct;
import java.util.Properties;
@Service
public class MQProducerSingleTon {
@Value("${alimq.topic}")
private String groupId;
@Value("${alimq.accessKey}")
private String accessKey;
@Value("${alimq.secretKey}")
private String secretKey;
@Value("${alimq.namesrvADDR}")
private String namesrvADDR;
private static Producer producer;
private static class SingletonHolder {
private static final MQProducerSingleTon INSTANCE = new MQProducerSingleTon();
}
private MQProducerSingleTon() {
}
static MQProducerSingleTon getInstance() {
return SingletonHolder.INSTANCE;
}
@PostConstruct
public void init() {
// producer 实例配置初始化
Properties properties = new Properties();
// 您在控制台创建的Producer ID
properties.setProperty(PropertyKeyConst.GROUP_ID, groupId);
// AccessKey 阿里云身份验证,在阿里云服务器管理控制台创建
properties.setProperty(PropertyKeyConst.AccessKey, accessKey);
// SecretKey 阿里云身份验证,在阿里云服务器管理控制台创建
properties.setProperty(PropertyKeyConst.SecretKey, secretKey);
//设置发送超时时间,单位毫秒
properties.setProperty(PropertyKeyConst.SendMsgTimeoutMillis, "3000");
// 设置 TCP 接入域名(此处以公共云生产环境为例)
properties.setProperty(PropertyKeyConst.NAMESRV_ADDR, namesrvADDR);
// 和上面的二选一,推荐下面这种方式,暂时链接不对 !!!!!!
producer = ONSFactory.createProducer(properties);
// 在发送消息前,必须调用start方法来启动Producer,只需调用一次即可
producer.start();
}
Producer getProducer() {
return producer;
}
}
```
AsyncMQService:
```java
import com.aliyun.openservices.ons.api.Message;
import com.aliyun.openservices.ons.api.Producer;
import com.aliyun.openservices.ons.api.SendResult;
import com.aliyun.openservices.ons.api.exception.ONSClientException;
import lombok.extern.slf4j.Slf4j;
import org.springframework.beans.factory.annotation.Value;
import org.springframework.scheduling.annotation.Async;
import org.springframework.stereotype.Service;
import javax.annotation.Resource;
@Slf4j
@Service
public class AsyncMQService {
@Resource
private MQProperties mqProperties;
@Value("${bdid}")
private String tags;
@Value("${sendToMq}")
private int sendToMq;
@Async(value = "MQTaskExecutor")
public void sendToMQTT(String data) {
log.info("发送的原始数据为---{}", data);
if (sendToMq == 1) {
Producer producer = MQProducerSingleTon.getInstance().getProducer();
Message message = new Message(mqProperties.getTopic(), tags, data.getBytes());
try {
SendResult sendResult = producer.send(message);
log.info("发送至阿里云成功--->{}", sendResult.getMessageId());
} catch (ONSClientException e) {
log.error("[ERROR]", e);
}
}
}
}
```
##### 接收端:
```java
import com.aliyun.openservices.ons.api.Action;
import com.aliyun.openservices.ons.api.ConsumeContext;
import com.aliyun.openservices.ons.api.Message;
import com.aliyun.openservices.ons.api.MessageListener;
import lombok.extern.slf4j.Slf4j;
import org.springframework.beans.factory.annotation.Value;
import org.springframework.stereotype.Service;
@Slf4j
@Service
public class PushMessageListener implements MessageListener {
@Value("${bdid}")
private String bdid;
@Override
public Action consume(Message message, ConsumeContext consumeContext) {
try {
if (bdid.equals(message.getTag())) {
String pushMessageStr = new String(message.getBody());
log.debug("从MQ接收到的消息为------->{}", pushMessageStr);
log.info("消费成功");
}
return Action.CommitMessage;
} catch (Exception e) {
// 消费失败,重发
log.error("[ERROR]", e);
return Action.ReconsumeLater;
}
}
}
```
***注意:其中tags是用来分别不同医院,进行数据隔离***
#### 2) 负载均衡
目前,我们大多数项目采用阿里负载均衡,一是方便的管理域名证书,二是图形化界面操作简便,可配置多台阿里服务器负载:
1.创建负载均衡实例(基本上已经创建);
2.域名解析:将指定域名解析至负载均衡服务器ip;
3.点击添加监听:
 4.跟着步骤设置


 5.关闭健康检查(因为发布会扰乱正常访问)
6.点击提交即可完成负载均衡配置。
#### 3) OSS的使用
OSS的只需要调用接口传文件到阿里云服务器,然后返回给前端链接地址:
```java
public String uploadObject(String filePath,
String fileName,
InputStream fileContent,
String contentType) {
OSSClient ossClient = new OSSClient(endPoint, accessId, accessKey);
ObjectMetadata objectMetadata = new ObjectMetadata();
objectMetadata.setContentType(contentType);
try {
ossClient.putObject(bucketName, filePath + fileName, fileContent, objectMetadata);
return "https://" +
bucketName + "." +
endPoint.substring(endPoint.lastIndexOf("/") + 1) +
"/" + filePath + fileName;
} catch (OSSException | ClientException oe) {
log.error("[ERROR]", oe);
} finally {
ossClient.shutdown();
}
return null;
}
```
#### 4) 短信发送
短信发送阿里云官方有代码演示:http://ytx-sdk.oss-cn-shanghai.aliyuncs.com/dysms_java.zip?spm=a2c4g.11186623.2.16.654c157bCQichE&file=dysms_java.zip
***注意:模板需要提前发起审核,签名名称必填审核通过才可用。***
### 3.腾讯云相关
#### 1) 直播
直播主要是推流和拉流,采用rtmp://协议;
git Demo地址https://github.com/tencentyun/MLVBSDK ,里面有直播详细介绍和配置方式。
#### 2) 人脸识别
在线版:参考腾讯云官方文档:https://cloud.tencent.com/document/product/867/32770
离线版(百度):参考宋庆龄幼儿园人脸识别https://code.aliyun.com/DestroyKing/morning-check.git ,授权一台服务器(Windows)需要299元,永久;
#### 3) 语音识别、云点播、事实音视频
语音识别腾讯云提供接口,调用如下:
```java
@Override
public String getVoiceText(Long hospitalId, String voiceUrl) {
HospitalConfigEntity hospitalConfig = (HospitalConfigEntity) redisUtil.get(CommonConst.HOSPITAL_CONFIG_PRE + hospitalId);
Credential cred = new Credential(hospitalConfig.getTencentSecretId(), hospitalConfig.getTencentSecretKey());
HttpProfile httpProfile = new HttpProfile();
httpProfile.setEndpoint("asr.tencentcloudapi.com");
ClientProfile clientProfile = new ClientProfile();
clientProfile.setHttpProfile(httpProfile);
AsrClient client = new AsrClient(cred, "", clientProfile);
CreateRecTaskRequest req = CreateRecTaskRequest.fromJsonString(this.getVoiceParams(voiceUrl).toJSONString(), CreateRecTaskRequest.class);
CreateRecTaskResponse resp = null;
try {
resp = client.CreateRecTask(req);
} catch (TencentCloudSDKException e) {
log.error("语音转文字失败:{}", e.getMessage());
return "语音转文字失败" + e.getMessage();
}
Long taskId = resp.getData().getTaskId();
return this.getResult(hospitalConfig, taskId);
}
private JSONObject getVoiceParams(String voiceUrl) {
JSONObject params = new JSONObject();
params.put("EngineModelType", "8k_zh");
params.put("ChannelNum", 1);
params.put("ResTextFormat", 0);
params.put("SourceType", 0);
params.put("Url", voiceUrl);
params.put("FilterModal", 1);
return params;
}
private String getResult(HospitalConfigEntity hospitalConfig, Long taskId) {
Credential cred = new Credential(hospitalConfig.getTencentSecretId(), hospitalConfig.getTencentSecretKey());
HttpProfile httpProfile = new HttpProfile();
httpProfile.setEndpoint("asr.tencentcloudapi.com");
ClientProfile clientProfile = new ClientProfile();
clientProfile.setHttpProfile(httpProfile);
AsrClient client = new AsrClient(cred, "", clientProfile);
String params = "{\"TaskId\":" + taskId + "}";
DescribeTaskStatusRequest req = DescribeTaskStatusRequest.fromJsonString(params, DescribeTaskStatusRequest.class);
DescribeTaskStatusResponse resp = null;
int tryCount = 20;
while (tryCount > 0) {
try {
Thread.sleep(500);
} catch (InterruptedException e) {
e.printStackTrace();
}
try {
resp = client.DescribeTaskStatus(req);
/**
* "Data": {
* "TaskId": 738145629,
* "Status": 1,
* "StatusStr": "doing",
* "Result": "",
* "ResultDetail": null,
* "ErrorMsg": ""
* }
*/
if (resp.getData().getStatus() == 2) {
break;
}
} catch (TencentCloudSDKException e) {
log.error("语音转文字失败:{}", e.getMessage());
return "语音转文字失败" + e.getMessage();
}
tryCount--;
}
return resp.getData().getResult().replaceAll("\\[0:\\d+.\\d+,0:\\d+.\\d+\\]\\s+", "").replaceAll("\n", ",");
}
```
其他请参考线上问诊项目:https://code.aliyun.com/HospitalBU/online-consultation-inquiry.git
*建议使用本地数据库测试,docker开启*
5.关闭健康检查(因为发布会扰乱正常访问)
6.点击提交即可完成负载均衡配置。
#### 3) OSS的使用
OSS的只需要调用接口传文件到阿里云服务器,然后返回给前端链接地址:
```java
public String uploadObject(String filePath,
String fileName,
InputStream fileContent,
String contentType) {
OSSClient ossClient = new OSSClient(endPoint, accessId, accessKey);
ObjectMetadata objectMetadata = new ObjectMetadata();
objectMetadata.setContentType(contentType);
try {
ossClient.putObject(bucketName, filePath + fileName, fileContent, objectMetadata);
return "https://" +
bucketName + "." +
endPoint.substring(endPoint.lastIndexOf("/") + 1) +
"/" + filePath + fileName;
} catch (OSSException | ClientException oe) {
log.error("[ERROR]", oe);
} finally {
ossClient.shutdown();
}
return null;
}
```
#### 4) 短信发送
短信发送阿里云官方有代码演示:http://ytx-sdk.oss-cn-shanghai.aliyuncs.com/dysms_java.zip?spm=a2c4g.11186623.2.16.654c157bCQichE&file=dysms_java.zip
***注意:模板需要提前发起审核,签名名称必填审核通过才可用。***
### 3.腾讯云相关
#### 1) 直播
直播主要是推流和拉流,采用rtmp://协议;
git Demo地址https://github.com/tencentyun/MLVBSDK ,里面有直播详细介绍和配置方式。
#### 2) 人脸识别
在线版:参考腾讯云官方文档:https://cloud.tencent.com/document/product/867/32770
离线版(百度):参考宋庆龄幼儿园人脸识别https://code.aliyun.com/DestroyKing/morning-check.git ,授权一台服务器(Windows)需要299元,永久;
#### 3) 语音识别、云点播、事实音视频
语音识别腾讯云提供接口,调用如下:
```java
@Override
public String getVoiceText(Long hospitalId, String voiceUrl) {
HospitalConfigEntity hospitalConfig = (HospitalConfigEntity) redisUtil.get(CommonConst.HOSPITAL_CONFIG_PRE + hospitalId);
Credential cred = new Credential(hospitalConfig.getTencentSecretId(), hospitalConfig.getTencentSecretKey());
HttpProfile httpProfile = new HttpProfile();
httpProfile.setEndpoint("asr.tencentcloudapi.com");
ClientProfile clientProfile = new ClientProfile();
clientProfile.setHttpProfile(httpProfile);
AsrClient client = new AsrClient(cred, "", clientProfile);
CreateRecTaskRequest req = CreateRecTaskRequest.fromJsonString(this.getVoiceParams(voiceUrl).toJSONString(), CreateRecTaskRequest.class);
CreateRecTaskResponse resp = null;
try {
resp = client.CreateRecTask(req);
} catch (TencentCloudSDKException e) {
log.error("语音转文字失败:{}", e.getMessage());
return "语音转文字失败" + e.getMessage();
}
Long taskId = resp.getData().getTaskId();
return this.getResult(hospitalConfig, taskId);
}
private JSONObject getVoiceParams(String voiceUrl) {
JSONObject params = new JSONObject();
params.put("EngineModelType", "8k_zh");
params.put("ChannelNum", 1);
params.put("ResTextFormat", 0);
params.put("SourceType", 0);
params.put("Url", voiceUrl);
params.put("FilterModal", 1);
return params;
}
private String getResult(HospitalConfigEntity hospitalConfig, Long taskId) {
Credential cred = new Credential(hospitalConfig.getTencentSecretId(), hospitalConfig.getTencentSecretKey());
HttpProfile httpProfile = new HttpProfile();
httpProfile.setEndpoint("asr.tencentcloudapi.com");
ClientProfile clientProfile = new ClientProfile();
clientProfile.setHttpProfile(httpProfile);
AsrClient client = new AsrClient(cred, "", clientProfile);
String params = "{\"TaskId\":" + taskId + "}";
DescribeTaskStatusRequest req = DescribeTaskStatusRequest.fromJsonString(params, DescribeTaskStatusRequest.class);
DescribeTaskStatusResponse resp = null;
int tryCount = 20;
while (tryCount > 0) {
try {
Thread.sleep(500);
} catch (InterruptedException e) {
e.printStackTrace();
}
try {
resp = client.DescribeTaskStatus(req);
/**
* "Data": {
* "TaskId": 738145629,
* "Status": 1,
* "StatusStr": "doing",
* "Result": "",
* "ResultDetail": null,
* "ErrorMsg": ""
* }
*/
if (resp.getData().getStatus() == 2) {
break;
}
} catch (TencentCloudSDKException e) {
log.error("语音转文字失败:{}", e.getMessage());
return "语音转文字失败" + e.getMessage();
}
tryCount--;
}
return resp.getData().getResult().replaceAll("\\[0:\\d+.\\d+,0:\\d+.\\d+\\]\\s+", "").replaceAll("\n", ",");
}
```
其他请参考线上问诊项目:https://code.aliyun.com/HospitalBU/online-consultation-inquiry.git
*建议使用本地数据库测试,docker开启*